
Repair hairline wall cracks correctly by checking first whether the crack is only cosmetic or linked to moisture, drywall joint movement, settlement, or repeated stress. Many fine wall cracks are minor surface defects, but some return because the real cause was never addressed. This guide explains how to inspect hairline cracks, how to repair them properly, and when a crack needs closer attention.
Hairline cracks often appear around drywall joints, corners, ceilings, doors, windows, and areas exposed to seasonal expansion or slight building movement. In many homes they can be repaired with simple materials, but it is important to know when a wall crack is no longer just cosmetic. The goal is not only to hide the line, but to reduce the chance of it returning.
Are Hairline Wall Cracks Serious?
Most hairline wall cracks are not structural. They are commonly caused by minor settlement, drywall seam movement, drying shrinkage, paint failure, or seasonal changes in temperature and humidity. However, a crack deserves closer inspection if it keeps widening, returns after repair, appears with dampness, or forms together with sticking doors, window movement, or uneven wall surfaces.
- Usually minor: thin and stable cracks in paint, plaster, or drywall with no moisture and no visible movement.
- Needs closer attention: cracks that return quickly, spread, stain, or appear with nearby surface damage.
- Possible structural concern: wider cracks, repeated diagonal movement, visible distortion around openings, or cracking that affects several connected areas.
How to Check Hairline Wall Cracks Before Repair
Before repairing anything, inspect the crack carefully. A cosmetic patch will fail if the real cause is still active. Start by checking the width, depth, location, pattern, and whether there are signs of dampness or movement nearby.
- Look closely at the crack in good daylight.
- Check whether it is only in paint or also in the plaster or drywall compound.
- Press lightly on the surrounding area to see if the surface feels loose or hollow.
- Look for bubbling paint, staining, damp smell, or soft drywall.
- Check nearby corners, ceilings, windows, doors, and baseboards for related movement.
- Measure the widest point and take a clear photo.
- Mark the ends lightly with pencil if you want to monitor whether it grows.
If you see damp marks, peeling paint, or soft wall material near the crack, do not patch the surface first. Check the moisture source first. A useful related guide is Damp Patches on Walls: Condensation or a Hidden Leak?.
Symptoms and What They Usually Mean
| Symptom | What It May Mean | What to Check | First Action |
|---|---|---|---|
| Thin crack in paint only | Paint shrinkage or surface aging | Scrape lightly to see whether only paint is affected | Prepare, fill lightly, sand, prime, repaint |
| Hairline crack along drywall seam | Joint movement or weak tape area | See whether it follows a taped joint line | Retape or reinforce before repainting |
| Crack with staining or peeling paint | Moisture or leak-related damage | Check for condensation, leaks, or cold wall surfaces | Fix moisture source before patching |
| Diagonal crack near a door or window | Localized movement or settlement stress | Check alignment and look for repeat movement | Monitor and inspect surrounding area carefully |
| Crack that reappears after repair | Underlying movement not solved | Review seam, framing, moisture, and seasonal pattern | Use a stronger repair method and investigate the cause |
Common Causes of Hairline Wall Cracks
Drying Shrinkage in Paint, Filler, or Plaster
This is one of the most common and least serious causes. Fine cracks can form when paint ages, filler shrinks, or decorative coatings lose flexibility over time. These cracks are usually superficial and remain stable.
Drywall Joint Movement
Hairline cracks often appear where drywall sheets meet. This usually happens when the tape bond is weak, the compound was poorly applied, or slight building movement keeps stressing the seam.
Seasonal Expansion and Contraction
Walls expand and contract slightly as indoor temperature and humidity change. This is more noticeable in homes with fluctuating humidity, cold exterior walls, or uneven heating.
Minor Settlement
Small settlement movement can create fine cracks, especially around openings and corners. Not all settlement is dangerous, but recurring or widening cracks should not be ignored.
Moisture Damage
Moisture weakens paint, filler, plaster, and drywall. If a crack appears with staining, soft material, or musty odor, investigate moisture first. You may also need this related guide: Cold Walls and Humid Air: Why Condensation Forms.
Best Materials to Repair Hairline Wall Cracks
The correct repair method depends on the crack type. A thin surface paint crack needs less work than a recurring drywall seam crack.
- For superficial paint cracks: fine surface filler or lightweight spackle
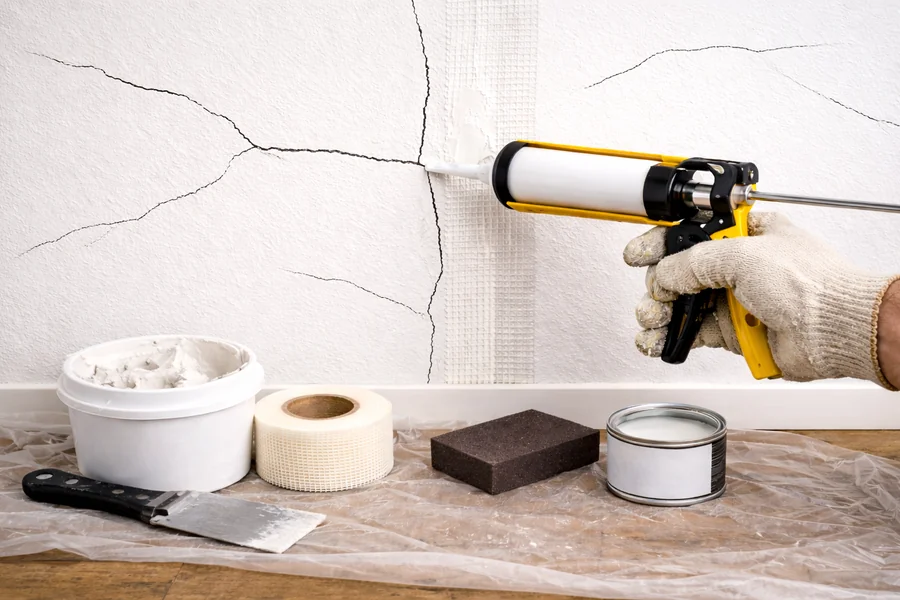
- For drywall seam cracks: joint compound and drywall tape
- For small flexible joints: high-quality paintable acrylic caulk
- For finishing: sanding sponge, primer, and quality interior paint
How to Repair Hairline Wall Cracks Step by Step
Step 1. Open and Prepare the Crack
Use a utility knife or scraper to remove loose paint, loose filler, dust, and weak edges. If needed, open the crack slightly so the filler can bond better. Do not leave flaky material behind.
Step 2. Clean the Area
Wipe away dust and debris. If the wall surface is dirty, clean it gently and let it dry fully before applying any repair product.
Step 3. Choose the Right Repair Material
Use a fine filler for stable cosmetic cracks. If the crack is along a drywall seam and has reopened before, use tape and joint compound instead of simply smearing filler over it.
Step 4. Apply Filler or Joint Compound
Press the product firmly into the crack with a putty knife. Keep the layer smooth and controlled. For seam repairs, embed the tape properly and feather the compound wider than the crack itself.
Step 5. Let the Repair Dry Fully
Do not rush the drying stage. Drying time depends on the product, room humidity, and repair thickness. A repair that is not fully dry will often fail later.
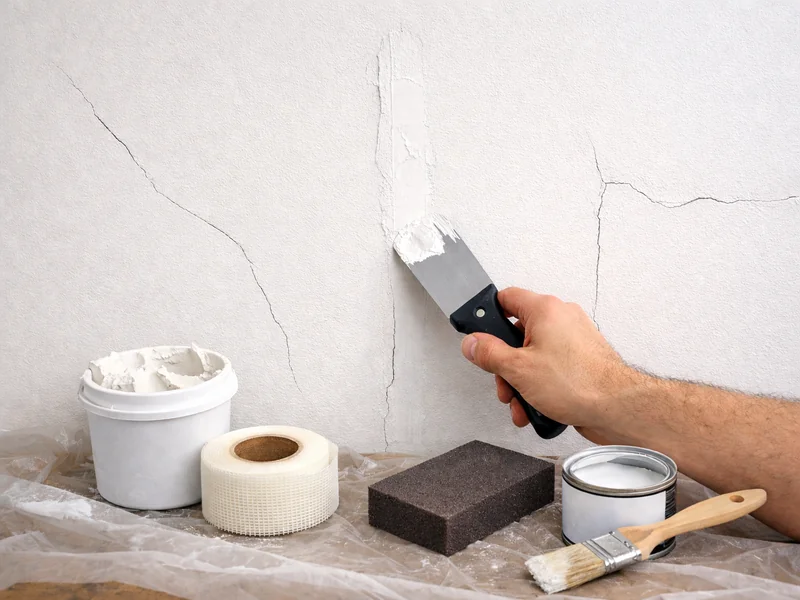
Step 6. Sand the Surface Smooth
Lightly sand the repair until it blends with the surrounding wall. Avoid aggressive sanding that damages the finished surface or exposes too much of the patched area.
Step 7. Prime the Repaired Area
Primer helps prevent flashing and gives the topcoat a more even finish. This is especially important if the repaired area is porous or the wall has a different sheen level.
Step 8. Repaint the Surface
Apply paint evenly and blend the edges into the surrounding area. In many cases, the best visual result comes from repainting the full wall section rather than only touching the repaired line.
When Hairline Wall Cracks Are Only Cosmetic
A wall crack is more likely to be cosmetic when it is very thin, stable, dry, and limited to the surface coating or a minor seam line. There should be no signs of dampness, widening, repeated movement, distorted trim, or soft wall material. Cosmetic cracks can usually be repaired without structural work.
When to Call a Professional for Hairline Wall Cracks
Call a professional if the crack keeps returning, becomes wider, spreads across multiple surfaces, appears with dampness, or forms together with sticking doors, uneven floors, or visible displacement around openings. You should also get help if the wall feels soft or if you suspect recurring movement in the structure.
- the crack becomes noticeably wider over time,
- the same crack reappears after careful repair,
- there is water staining or damp material nearby,
- multiple cracks appear in the same area,
- doors or windows nearby stop aligning properly,
- cracking affects more than one connected part of the room.
Safety Warnings Before Repair
- Do not sand old painted surfaces aggressively without considering dust exposure.
- Do not patch over damp drywall or an active leak.
- Be careful near sockets, switches, and concealed services.
- If mold is present, deal with the moisture source first and clean the affected area safely.
If indoor humidity is high and walls stay cold, surface defects may keep coming back. This guide may also help: Winter Humidity Target for Preventing Condensation at Home.
Common Mistakes When Repairing Hairline Wall Cracks
- patching over dust, loose paint, or weak material,
- ignoring moisture before cosmetic repair,
- using filler alone on a moving drywall seam,
- skipping primer before repainting,
- applying thick repair layers that shrink later,
- repairing the line without checking why it formed.
FAQ About Hairline Wall Crack Repair
Can I repair hairline wall cracks myself?
Yes. Many cosmetic hairline wall cracks can be repaired by a homeowner using basic tools and the correct filler. The important part is checking first that the crack is not linked to moisture or repeated movement.
Will hairline wall cracks come back?
They can return if the underlying cause is still active. Surface-only repairs often fail when the real issue is joint movement, moisture, or seasonal stress.
Should I use caulk or filler?
Use filler or joint compound for most interior wall crack repairs. Paintable acrylic caulk can help in small flexible joints, but it is not the best answer for every wall crack.
Are hairline wall cracks a sign of foundation problems?
Not always. Many are only cosmetic. Concern rises when cracks widen, repeat, or appear with other signs such as distortion around doors and windows.
Do I need to repaint the whole wall?
For the best finish, often yes. Spot repairs can remain visible because of texture and sheen differences, even after careful patching.
Conclusion
To repair hairline wall cracks properly, you need to do more than fill and paint over the line. First confirm whether the crack is superficial, moisture-related, or movement-related. Then use the correct repair method for that specific cause. A careful inspection, correct material choice, and proper finishing steps will give a cleaner result and reduce the chance of the crack returning.
For general home safety and maintenance information, readers can also review public guidance from the U.S. Consumer Product Safety Commission.